The main issue for NVIDIA kernel-mode driver crash seems to be an outdated or corrupted driver which is conflicting with Windows and causing this whole issue. Sometime incorrupt configuration of Windows Visual Settings or Graphic Card Settings can also cause this error. So without wasting any time let’s see how actually to fix NVIDIA Kernel Mode Driver has stopped responding.
NVIDIA Kernel Mode Driver has stopped responding [SOLVED]
Note: Make sure to create a restore point, just in case something goes wrong.
NVIDIA Kernel Mode Driver has stopped responding [SOLVED] Method 1: Reinstall NVIDIA Drivers Method 2: Disable Windows Visual Enhancements Method 3: Set PhysX configuration Method 4: Turn off Vertical Sync Method 5: Registry Fix
Method 1: Reinstall NVIDIA Drivers
Download Display Driver Uninstaller.
Boot your PC into Safe Mode using any of the listed methods.
Double-click on the .exe file to run the application and select NVIDIA.
Click on Clean and Restart button.
Once the computer restarts, open chrome and visit the NVIDIA website.
Select your product type, series, product and operating system to download the latest available drivers for your Graphic Card.
Once you download the setup, launch the installer, select Custom Install and then select Clean install.
Reboot your PC to save changes and see if you’re able to Fix NVIDIA Kernel Mode Driver has stopped responding error.
If the issue still occurs, remove the drivers following the above method and download older drivers from the NVIDIA website and see if this works.
Method 2: Disable Windows Visual Enhancements
Press Windows key + R then type sysdm.cpl and hit Enter to open System Properties.
Switch to the Advanced tab and under Performance click Settings.
Make sure to checkmark “Adjust for best performance.”
Now, under the list, everything will get unchecked, so you need to manually checkmark the following which items are mandatory:
Smooth edges of screen fonts Smooth-scroll list boxes Use drop shadows for icon labels on the desktop
- Click Apply, followed by OK.
- Reboot your PC to save changes and see if you’re able to Fix NVIDIA Kernel Mode Driver has stopped responding error. Also Read: Fix NVIDIA Container High CPU Usage on Windows 10
Method 3: Set PhysX configuration
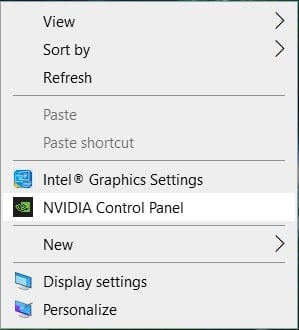
Right-click on the desktop in an empty area and select the NVIDIA control panel.
Then expand 3D Settings and then click on Set PhysX configuration.
From PhysX Settings drop-down, select your Graphics Card instead of Auto-select.
Reboot your PC to save changes.
Method 4: Turn off Vertical Sync
Right-click on the desktop in an empty area and select the NVIDIA control panel.
Then expand 3D Settings and then click on Manage 3D settings.
Now under “I would like to use the following 3D settings” find Vertical sync settings.
Click on it and select “Off” or “Force Off” to disable Vertical Sync.
Restart your PC to save changes.
Method 5: Registry Fix
Press Windows Key + R then type regedit and hit Enter to open Registry Editor.
Navigate to the following registry key: HKEY_LOCAL_MACHINE\SYSTEM\CurrentControlSet\Control\GraphicsDrivers
Right-click on GraphicsDrivers and select New > DWORD (32-bit) value.
Name this DWORD as TdrDelay then double-click on it and change it’s value to 8.
Click OK, and this will now allow the GPU 8 seconds to respond instead of the default 2 seconds.
Reboot your PC to save changes. Recommended:
Fix NVIDIA Control Panel Not Opening How To Fix Error 0x80004005 on Windows 10 How to create a password reset disk in Windows 10 Fix Windows Update Error 80070103
That’s it you have successfully Fix NVIDIA Kernel Mode Driver has stopped responding error but if you still have any queries regarding this post then feel free to ask them in the comment’s section.


