After following this simple tutorial, you can start editing your audio recordings like a pro!
What Is GarageBand?
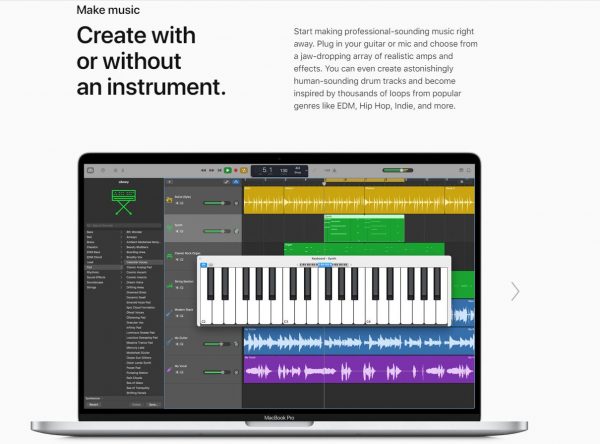
GarageBand is loaded with music creation and editing features—enough for it to be a standalone app for music designers and composers. It has a collection of virtual musical instruments like piano, guitar, violins, etc. You can also connect additional equipment like microphones, amplifiers, external equalizers, and your own instruments to enhance your recordings. It’s a great tool if you want to add your original music when creating or editing videos on iMovie. It has a sound studio where you can edit your music: create loops, add sound effects, clean up vocals, and all that you could ask for in audio editing software. You can create your own soundtracks like a professional DJ or add background music to voice narrations if you want to start a podcast.
GarageBand Tutorial for Mac: How to Edit Your Recordings Like a Pro
As mentioned, this tutorial is focused on editing already recorded audio. However, we will briefly touch on its other features like connecting your sound instruments.
Installation and Getting Started
The app is created and designed by Apple so it comes preinstalled on your Mac most of the time. If you don’t have it on your device or have uninstalled it for some reason, you can download it from the App Store. When you first launch GarageBand, you will have to give the app permission to access your libraries and folders. To get started, click Allow on the prompt when you launch the app. You may have to go to your settings, click on the padlock icon, enter your Mac’s password if you have one, and tick the checkbox beside GarageBand. This will indicate that you are giving it permission to access your files and make changes to your audio settings. Don’t worry about doing this yourself because the app will take you to this window when you’re getting started. Download GarageBand
Creating a Project
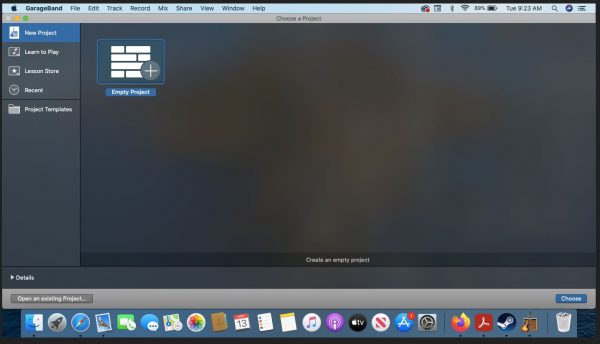
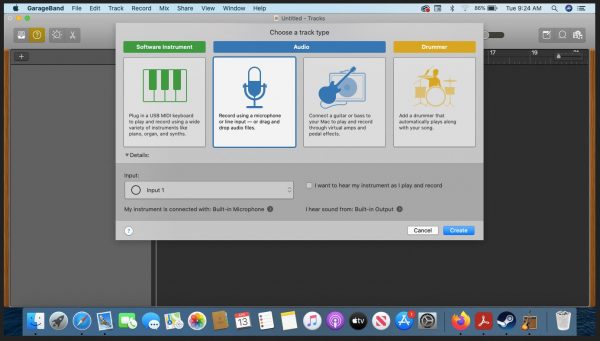
The first thing you will see upon opening the app is the window that says Choose a Project. If you have used the app before, you will see your previous projects. Click on Empty Project if you want to start from scratch. A window will pop up where you can choose which kind of project you want to start. You will see three options: Software Instrument, Audio, and Drummer. For this purpose, you would click on the microphone icon under Audio. This is where you can edit pre-recorded audio. Don’t be confused because this mode is not just for editing vocals; it also allows you to add and edit the background music or the backing track. If you want ultra clean song recordings or recordings for podcasts, record the vocals and the backing tracks separately. You can combine the two on GarageBand which is covered in this tutorial. Record the song in parts or stanzas so you don’t have to start over when you make a mistake. You can patch them all together cleanly as though you’ve recorded the whole thing in one take!
Using Templates
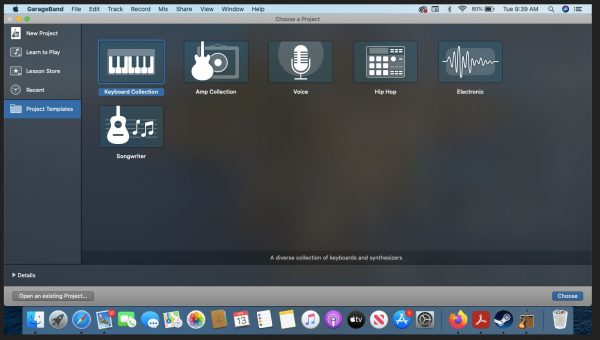
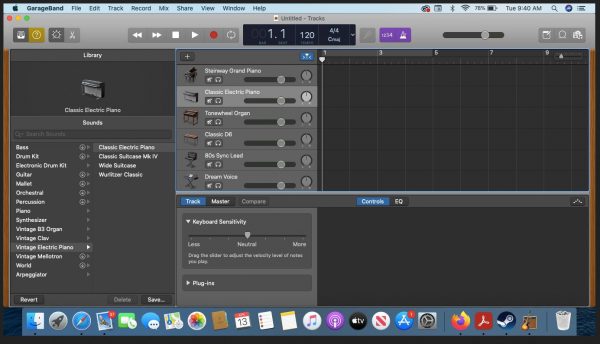
You can also choose from the default templates but this is not recommended for beginners even though it seems like the easier option. Each of these defaults is specifically designed for different purposes. To use a template, click on Project Templates from the left menu under Choose a Project. There are six modes that you can work on:
Keyboard Collection
Here, you will have the option to make your music sound like different pianos and keyboards. Among them are Steinway Grand Piano, classic electric piano, tonewheel organ, and more. Add your track by dragging and dropping it from your library to the appropriate instrument field. Your sound library is accessible from the right panel. Click on the Media Browser icon on the top right and it will expand to show iTunes media.
Amp Collection
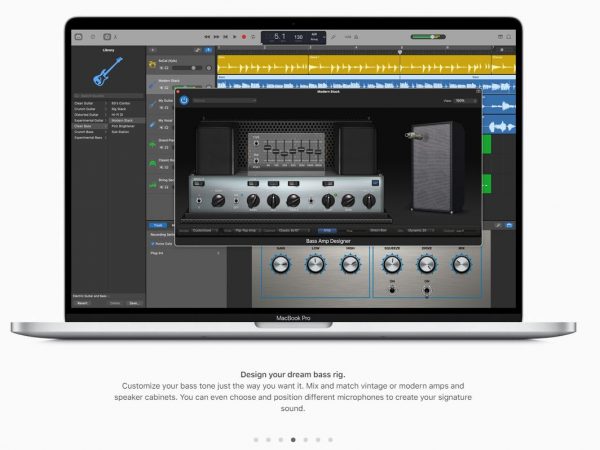
In this mode, you can edit your sounds using different types of amplifiers. This is great if you don’t have an external or physical one. Some of the amplifiers include royal rock, maelstrom, and stereo. You can also choose from the sound templates included in this mode like distorted guitar, crunch bass, and experimental guitar. Do the same for adding your tracks as stated in the instructions above.
Hip Hop
This is where you can add really cool sound effects to your tracks suitable for hip-hop music. Some effects you can use are the deep sub-bass, vox bass lead, EDM bass and lead, and more. You can apply different effects on select regions so you can really play with it and be as creative as you wish.
Electronic
In this mode, you can make your tracks sound like electronic instruments. Some of the effects you can use are shifting patterns synthesizer, buzzing metallic lead, and titanic waves. In this electronic drum kit, you can use effects like electro bump, indie disco, deep tech, and steely beats. You can also make it sound like the audio was recorded inside a particular venue like a big room.
Songwriter
This feature is for more advanced users but it is not too difficult to use. It is designed with track regions so you can easily separate the vocals from the other soundtracks. The Tracking Vocal region is where you can drag and drop your vocal track. Then you can add guitar tracks, drums, piano, etc.
Voice
Voice mode lets you do the same things as in Songwriter mode, but it gives you easy access to the vocal effects that you can add. You can choose from narration style, bright vocals, fuzzy vocals, telephone vocals, and robot vocals. Note that the reason the above modes are not recommended for beginners when editing pre-recorded audio is that you have to edit each file on separate modes and then go back to edit them as one whole track. It is recommended to those who already know how to play with the complicated instrument and synthesizer settings. This GarageBand guide is a tutorial on how to simplify the editing process of your recordings.
Connecting Sound Instruments
To connect instruments like an electric guitar, you would need to connect an audio interface, a device that lets you convert the sounds it receives into digital signals. You can connect it to your Mac using a USB or other compatible cables. Whichever GarageBand mode you’re in, click on the red recording icon and start playing once your instrument is connected. You will then see the track digitized on your screen.
Adding and Editing Voice Recordings
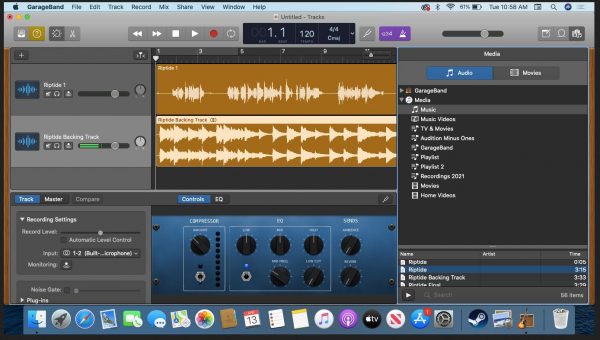
This is the main focus of this GarageBand tutorial, but it’s a simple enough step so we included it in this section. You can choose to record your vocals in different ways. As mentioned above, it is highly recommended that you record your vocals separately from the backing track. This will allow you to clean your voice recording better. You can use a voice recorder or record your voice on your computer using a USB or Bluetooth microphone. Another tip if you don’t have a professional mic or recording booth is to record your voice facing a closet with clothes in it. This will block out noises and isolate your voice. Save your voice recording as mp3 and upload it to your iTunes library so you can access it from GarageBand. For this purpose, make sure that you are working on an empty project and have selected Voice from the options. Click on the media browser icon from the top menu then drag and drop your vocal track to the top region. Don’t be confused because regions are also called “tracks” when editing. If you have recorded your vocals in parts, you can either combine them in one region or drag and drop them to different regions so you can overlap them or add spaces in between.
Adding and Editing Backing Tracks
Do the same for your backing tracks but make sure that they are on a separate region from the vocals. Backing tracks are instrumentals or minus-ones, also called accompaniment. If you don’t know how to play the backing tracks yourself, you can find some for free on YouTube.
Cutting and Splitting Tracks
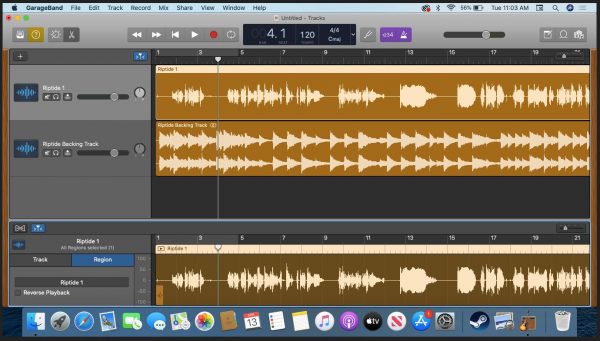
To cut or split tracks, make sure that you select that particular track only. Double click on the track or region from the upper panel. That track will show up on the lower panel and from there, you can move the Playhead to where you want to cut or split the track. The Playhead is the vertical white line that lets you highlight parts of the track. Right-click on the location and click Cut. You now have the option to either delete parts of the track or put them in separate regions.
Combining Tracks
It’s important to note that you cannot combine two separate tracks on GarageBand and turn them into one region or track. What you can do is put them side-by-side so that the music will continuously play. If there is unwanted silence or space between two tracks, you can either cut out that part or move the next track to a different region and overlap them to cover the space.
Adding Sound Effects
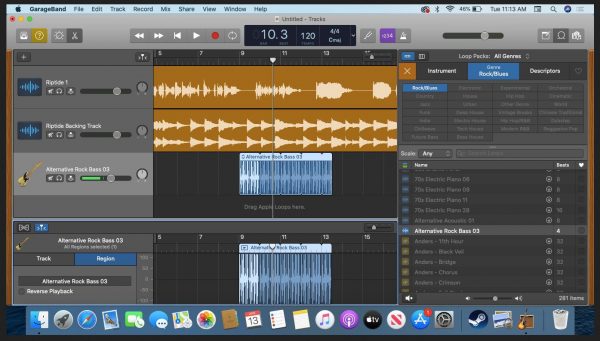
From the top-right menu where you saw the media browser from the instructions above, you will see the Loop button beside it. Click on it and it will give you tons of sound effects that you can add to your music. You can add instrument sound effects or choose from different genres. From the Rock/Blue genre, for example, you can add an effect like alternative rock bass. Don’t worry if some of them are grayed out; it only means that you need to download them from the sound library and it only takes a few seconds. Select the sound effect that you want and drag and drop it to a separate track so you can manipulate it without affecting your vocals or backing tracks. By default, this sound effect will only play for a few seconds. If you want it to play longer, double-click on it, and from the lower panel, drag the tail to however long you want the sound to loop.
Using the Equalizer
GarageBand has two types of equalizers (EQ), and this tutorial will teach you how to use both. One is for the main track—which means the whole song or audio file—and the other is for individual tracks. Once you click on a track, you can click on the Smart Controls button from the left of the top menu beside the Cut icon. This will show the equalizer controls on the lower panel. It may be too small to manipulate the controls, so you can enlarge it if you want to by dragging its top bar. Once you are on the Equalizer view, you will see on the left the Track and Master options. Make sure you select Track if you only want to edit either the vocals or the backing track and not the whole file.
Master EQ
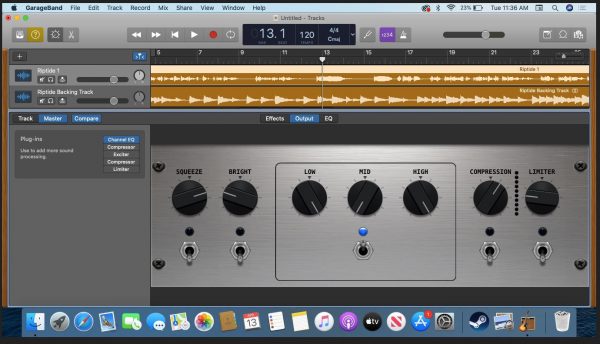
The master equalizer has three options: Effects, Output, and EQ. The Effects let you add and control the echo. Because this is the Master EQ, this will apply to the whole audio file. The output lets you play with more settings like compression. And on the EQ mode, you can drag and drop points inside the equalizer to adjust the audio settings as you wish.
Track Controls
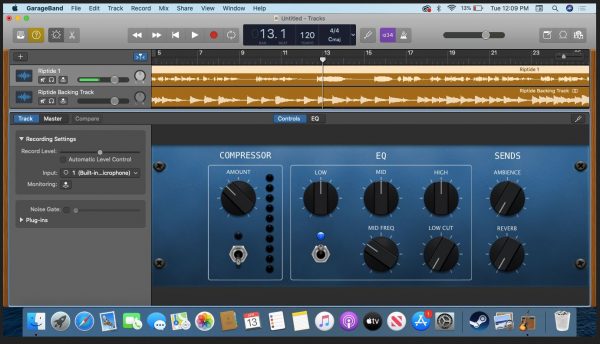
The Track EQ panel lets you play with compression, sound ambiance, and reverb. You can also adjust the dials on the low frequency, mid, high, and so on. It also has an EQ window where you can adjust the audio as you would on the Master EQ.
Using the Level Bars
Beside each region or track, you will see a level bar. This lets you control the volume for each track. If you recorded one track with a lower volume, for example, you can raise the volume so that it matches the other tracks. You can also shift the stereo dial from left to right. This is also where you can mute each track if you only want to hear a specific track.
Pro Tips: Cleaning Up Your Vocals
GarageBand has two very useful features that allow you to clean up your voice recordings like a pro. This tutorial will teach you how to use them properly and produce clean and crisp vocals.
Pitch Controls
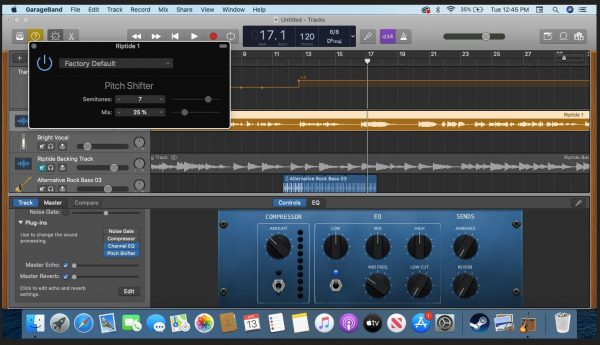
Not all of us have perfect pitch. Even if you are a professional singer, there are times when you may hit the note flat or sharp. The pitch control in the app can fix this. Of course, not everyone is comfortable using this feature since it is manipulating the pitch of your actual singing voice. However, it is very useful in fixing minor mistakes. You can also use this feature to adjust the pitch of a backing track to fit it for a female or male voice. To adjust the pitch of a particular note, you would have to isolate that part of the recording by splitting and cutting it, and then moving it into a separate region. If you want to adjust the whole backing track, then simply select that track and double-click on it. Click on the Smart Controls button again and on the Plug-ins, choose Pitch Shifter. You can now adjust the pitch of that particular track. Take note that manipulating this aspect may make your voice sound unnatural if you shift the pitch too much so be careful. You will also see Mix under Semitones. If you don’t put it to 100%, you will still hear your original voice singing the original pitch in which you sang.
Voice Effects
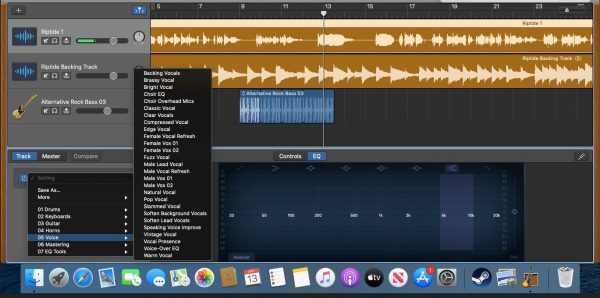
These are excellent effects that you can apply to a voice recording. You can make yourself sound more like a pop singer or make it sound brighter or warmer. Make sure that the vocal track is selected. Click on the Smart Controls button again from the left of the top menu and select EQ on the lower panel. From the Setting under Track, click on Voice, and from there, you can select the voice effect that you want to apply. You will hear the effect in real-time when you play the audio. Make sure that you mute the backing track so that you can hear the effect on your voice clearly.
Exporting Your Edited Audio
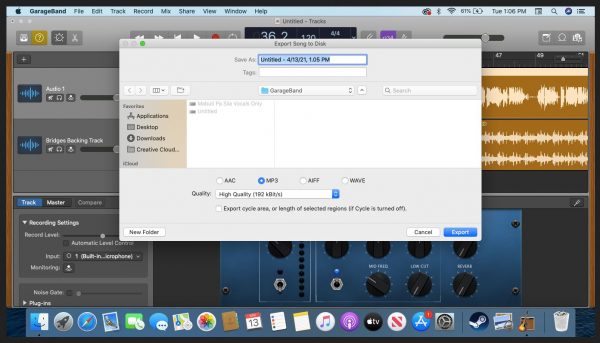
When you’re happy with your edited audio, you can click on File from the top menu then select Save or Save As. This will let you save it as a GarageBand Project. This means that you can edit this project if you wish. While you can play the music from your iTunes Library, take note that it will not be saved as an mp3 file and thus, will not play if you use another media player. To save it as an MP3 file, do the following:
Why Use GarageBand?
The best thing about the GarageBand app is it is completely free! It’s an extremely reliable audio editor for Mac users and you can easily sync your projects across your devices. You can install the app on your iPhone or iPad, and you can edit your recordings wherever you are. It has all the essential features you could ask for from audio editing software plus you can create original music using only the virtual tools inside the app. Even professional music designers use Garageband. You don’t have to pay extra for premium features. Another advantage is, unlike other audio editors, you can directly export your music as an MP3 file.
Final Word
GarageBand is truly a superb app that lets you record, edit, compose, and arrange music. Though there is a learning curve, this GarageBand tutorial will get you editing your audio like a pro in no time! So download it for free and try the features now.
